Thursday, May 16, 2013
The Importance of Blogging
In this day and age social media is heavily involved in most
people’s day to day lives. This fact has become an important tool for
businesses of all kinds, including photographers.
Retouching with Graphics Tablets
As today’s technology expands, more and more recourses
become available to photographers, graphics designers, and many others in
similar fields. One interesting piece of new technology is the graphics tablet.
This is suddenly becoming very popular among photographers as a tool for
editing images, however it was originally designed for graphic designers. One
particular model of graphics tablet that seems to be attracting a lot of
attention is Wacom’s ‘Bamboo’ line. These can be purchased at most electronic
stores, as well as online for as little as around $100; the more advanced
models reaching the $300-$400 mark.

So why have these tablets become so popular amongst
photographers as well as the other creative industries that it was originally
designed for?
That seems pretty obvious. Simply plug the tablet into your
computer or laptop, and use the stylus to essentially draw on your images in
whatever program you may use. This tool allows you to be more precise, and to
edit faster than you could dream of doing with a mouse.
Here is an example of what may be much more easily achieved,
using a tablet and stylus;


The options for how the stylus works with the tablet are
also fully customisable, allowing the user to personalise the way they use it
to what suits them best.

As with any new technology, there are cons to go along with
the amazing pros included. Searching through various blogs, vlogs, webpages,
and etc, the only con I have found is the learning curve. This differs from
person to person; some say it doesn’t take long, some saying they found it very
difficult to perfect after using a mouse for so long.
Overall the reviews, forums, vlogs and blogs say predominantly
excellent things about working with tablets, recommending everyone to try it,
and ensuring post production will improve
I will certainly be investing in one and trying it out for
myself!
Sony's new Dog Harness
That's right...a camera harness...for a
dog.
Sony recently launched the AKA-DM1 In
Japan at around $53, the mount is
compatible with Sony's HDR-AS15 rugged
video camera. Weighing in at around
128grams, Sony says that the design
won't wear dogs down.

The purpose behind the strap is to
allow owners to mount the camera and record the world
from their pets point of view. Quite
honestly If I were to mount this onto my puppy
I'd have 12 hour footage of my dog
chasing anything that wonders into the garden combined
with a few mandatory hours of nap time.
Although in saying that the Camera's included Wi-Fi
capabilities allow for cable-free video
transfers, So if I had nothing better to do I could watch live
streaming to make sure she wasn't up to no good.

Various youtubers seem to have beaten
Sony to the punch-line though by strapping their GoPro
cameras to their pets for some time
now. Including this one shot by a Great Dane at the park.
On that note, speaking of GoPro videos, check out this beauty:
Wednesday, May 15, 2013
Lara Jade
I first discovered Lara Jade through her Facebook page in 2011. Even though I wasn't established in my photography yet, and had no idea what field of photography I wanted to pursue, I instantly fell in love with her work. She inspired me because she started out so young, and helped me believe that I could make it in the competitive photography industry, no matter what direction I took.
Lara Jade grew up in West Midlands, England. While living
there she took an interest in photography. At the young age of thirteen she
picked up her father’s camcorder and began taking stills with it. Lara started collecting
compact cameras to photograph with. By the age of fifteen she had discovered
fine art and self portraiture, and received her first SLR, a Canon 350d, for
her sixteenth birthday.
At just seventeen years old, Lara started her own business, starting
off with small portraiture clients’, and quickly moving on to larger clients
like book publishers and music labels. Soon after starting her business she
took on fashion, and later moved to London to work with other photographers in
the fashion industry.
Lara is always striving to improve her photographic and
business skills. In September 2005 she began a National Diploma in Photography,
and later, in September 2007, studied Visual Communication at UCE. Even this
far into her business she continues to learn and improve at every opportunity,
to maximize her abilities as a photographer and business woman.
As Lara Jade explains in her website biography; “I am
influenced by past and present style; whenever I shoot I like to create stories
with an underlying sense of narrative, whether this is in my personal work,
commercial campaigns or editorial projects. I am deeply inspired by elements of
influential style, film noir, old masters in painting and photography,
Romanticism and untouched beauty. All of my experiences in life thus far have
been reflected through my imagery, and continue to shape me personally, and as
an artist.”

The above image was posted to the Facebook page; Lara Jade
Photography in April last year (2012). It is a picture from the very beginning of her
journey as a fashion photographer, and as she describes it, it was one of the
first fashion images that she was really proud of. Her pride in this image
helped to push her to follow fashion photography, and influenced her to keep
going.
Throughout her quickly expanding career as a photographer,
Lara Jade has acquired many major clients. These include magazines such as
Elle, Lush, Material Girl and Institute, as well as other clients like Sony
Music, Schwarzkopf, Harper Collins, and Lamb. As well as working with these
well known clients Lara continues to photograph for herself, as well as holding
photography workshops for aspiring fashion photographers all over the world.
She has also written a book, Fashion Photography 101, which was published recently.

As my idol, Lara Jade influences me greatly. I stated at the beginning of this blog that I was interested in starting my own business as a pets/family/couples/newborn/glamour photographer. However now I am rethinking again thanks to Lara Jade and other photographers like her, and considering starting out with glamour and pursuing fashion photography.
Here is a small selection of some of my favourite Lara Jade photographs;


People Today
It's funny to see that people these days are scared and wary
of people and photographers with a big DSLR camera and a long lens. On the
other hand, if you're using a small compact camera then that seems to be fine. This
is especially true since the increase in the amount of selfies which are posted
around the net. This is seen in all the family photos posted across Facebook
and Instagram, so loved ones can see them across the world.
However, when someone else wishes to take their picture all
that goes out the window. When you're out and about in public places snapping
away taking photos you always seem to get that sideway glance of are they
taking photos of me? What are they going to with that photo? Yet out of common courtesy
we as photographers sometimes will ask if they mind having their photo taken
but this is more so that we can get a nicer picture. What a lot of people don't
know is that if you're out in a public place anyone has the right to take your
photo. Now I don't know if this is a good thing or a bad thing but it's just
the way things are. I know a few people and even myself people have come up to
them ask tell them you can't take my photo, why are you taking my photo etc, so
it turned around to one person one day and said do you have Facebook ? Yes, and
do you post photos to Facebook? Yes, so then how is that any different than me
taking your photo? As you are posting for the world to see your photos I'm just
helping you along.
Tuesday, May 14, 2013
Wildlife
Since my passion is Wildlife/Nature
photography I thought I would write about some of the people that inspire me
and that I follow and pass on some of their wisdom too. First of all I would
like to mention Michael Snedic and Mark Rayner the guys behind Trekabout
Photography Workshops.
Michael Snedic is one of Australia's
most accomplished wildlife and nature photographers. He has been photographing
across Australia for the past 16 years. He is also a highly experienced,
professional photography tutor, especially in digital photography. Michael
loves sharing his images and photographic knowledge with the public.

Mark Rayner is a fully accredited
professional photographer (AIPP), an expert in post processing, retouching and
workflow. His specialties lay in Wedding, portrait and commercial photography. He
recently received one of four 'Highly Commended' awards in the '2012 Shoot the
Architect' photography competition from the Australian Institute of Architects.
Together Michael and Mark have formed
the company Trekabout Photography Workshops. Trakabout Photography offers personalised photographic tuition,
in stunning natural locations and at affordable
prices. Brisbane photography workshops are offered by many companies.
Attention to detail and high levels of hands-on individual tuition. I have had
the pleasure to be able to join them on a few of their workshops and it has
been great both Michael and Mark are very welcoming and very happy to share
their knowledge and experience with you.
Below are
the Links to both Michael and Mark websites and their Trekabout Website.

Here are some tips done by Mark Rayner about wildlife
photography
7 Tips to help
improve your Wildlife Photography.
Some of these tips can equally be applied to people (portrait) and your pet photography.
1. Shoot from the eye level of your subject (or slightly lower). The difference is remarkable when compared to just standing and shooting down on your subject. Try the different angles next time you're out in the field and you will see what I mean.
2. Focus on the eye. Make sure you get those eyes in focus or your image will surely fail. It is just that simple. The eyes must be tack sharp and if they are you are halfway to a great shot.
3. Leading on from point 2, use single point focus. If you have your camera set to auto focus point selection you run the risk of the camera picking up the wrong spot and you'll end up with your subject blurred. By using single point focus, you chose the spot that the camera will focus on. Using this method you can then make sure your focus point is lined up on the eye.
4. Blur out your background. Shoot "wide open", i.e. use a large aperture, say, f/2.8 to f/5.6 depending on your lens of course. This will eliminate distractions in the background and allow all of your viewer's attention to be directed to your subject. Nice soft bokeh (background blur) can make or break a good photo. The added advantage to shooting with a wide open aperture is that, automatically, your shutter speed will be faster. Faster shutter speed equals less chance of a blurred image due to movement or camera shake.
5. Choose your background carefully when composing your shot. You can't always do this with moving subjects as you may just have to grab the moment, but if you do have time, study your background. Moving a small distance may mean the difference between having a stick growing out of your subject's head or not. It is easy to get carried away with the excitement of the moment but that small change of position could be the difference between a good shot and an award winner.
6. Get to know your subject. Study the way your subject, be it a King Parrot or a small dragonfly, moves and interacts with its environment. If you understand what makes your subject tick, you can often anticipate what they will do next and be prepared in advance for the shot.
7. Make sure your camera settings are ready for the shoot. Typically you will have aperture, ISO, focus point, exposure compensation, metering, shutter mode (single shot or high speed continuous) all selected and set before you lift your camera to your eye, or even begin approaching your subject. Be prepared and ready to just focus and shoot. The last thing you need is to be quickly changing settings while that Tasmanian Tiger disappears back into the forest. Here is my last shot of a Tasmanian Tiger.

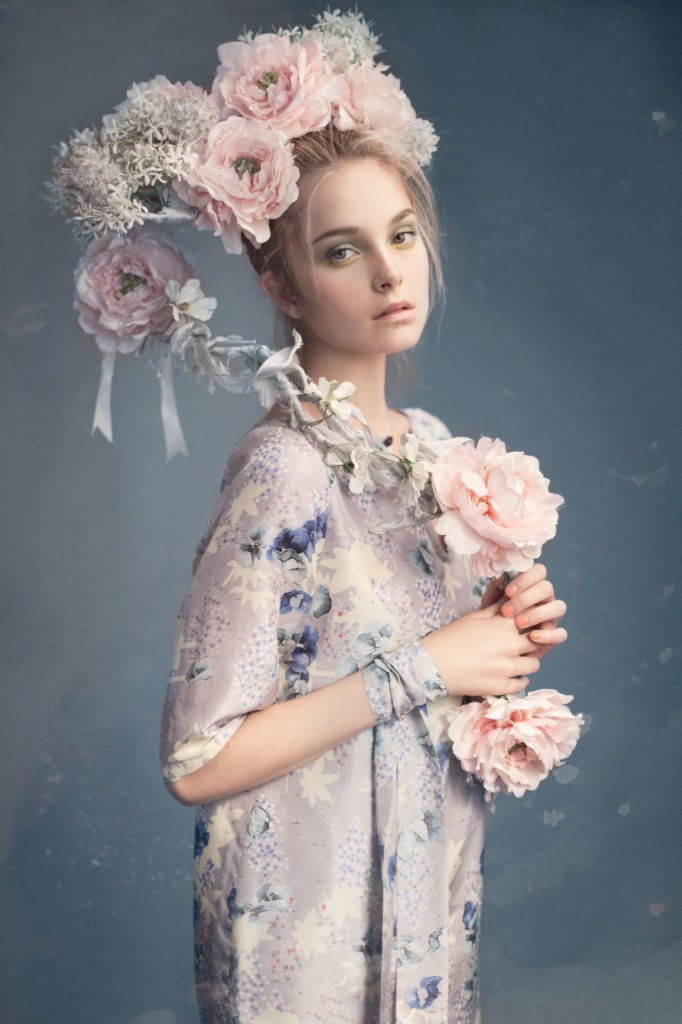
Kirsty Mitchell
-->


I first discovered Kirsty Mitchell and her
amazing Photography around three years ago, when she had as little as 500
followers (recent count 42,968) Her photographs initially caught my eye but
once I read her story I was completely hooked.
Kirsty Mitchell for the past three years
has been working hard on a series she likes to call ‘Wonderland’ at first
glance her images are sensational, bright and honestly they could hold my
attention for hours. The more I look, the more detail I find and I think it’s incredible.
But what really caught my attention and has made her name stick with me, was
the reason behind all of this.

Kirsty Mitchell’s mother Maureen was an
English teacher, who spent her life inspiring generations of children with
imaginative stories and plays, and sadly in 2008 Maureen died from a brain
tumor, and Kirsty channeled her grief into her passion for Photography, and
created ‘Wonderland’ a tribute to her Mother.
It initially all began as a small summer
project but soon blossomed into something MUCH, MUCH bigger.
I soon found her website and began to
follow her journey. The painstaking detail that goes into these images is just
phenomenal, you can read all about the work that goes into each and every
single photograph on her website, Kirsty will even wait up to 12 months to
shoot an image just so that flowers in bloom match the colors of her dresses.

I think that her work is beautiful and so
inspiring, and It’s a relief to finally see her work receiving the recognition
that it so deserves.
If you have a spare few minutes please have
a look at her website, You will not be disappointed.
http://www.kirstymitchellphotography.com

Subscribe to:
Posts (Atom)